
Germination, the fundamental process by which a seed awakens from its dormant state and transforms into a young plant, is a marvel of nature. For any aspiring gardener, understanding and mastering this initial stage is crucial for a thriving garden. While a dry seed may remain inert indefinitely, providing the correct environmental cues initiates a cascade of metabolic activities, culminating in the emergence of a new life. This guide will delve into the intricacies of germination, providing practical steps and insights to ensure your seeds reach their full potential, often with the crucial assistance of garden grow lights.
The Science Behind the Sprout: What is Germination?
At its core, germination is the rehydration and subsequent activation of a plant embryo encased within a seed. Think of a seed as a miniature, self-contained life support system, patiently awaiting the right conditions to begin its journey. The process typically begins with the absorption of water, a phenomenon known as imbibition. This rehydration is vital, as it reactivates enzymes and metabolic pathways that have been dormant. Optimal temperatures, generally ranging from 65 to 80 degrees Fahrenheit (18 to 27 degrees Celsius), further stimulate this metabolic activity, leading to rapid cell division. The first visible sign of success is often the emergence of the radicle, or primary root, which anchors the nascent plant and begins to absorb nutrients. Soon after, the hypocotyl or epicotyl pushes upwards, bringing the cotyledons (seed leaves) or true leaves into the light.
- Seeds are living organisms in a state of suspended animation, waiting for the right conditions to sprout.
- Water absorption (imbibition) is the first critical step, rehydrating the seed’s internal structures.
- Optimal temperature is crucial for activating the enzymes necessary for growth and development.
- The emergence of the root and then the shoot signifies successful germination.
Why Cultivate Your Own: The Benefits of DIY Germination
Learning the art of germination offers a myriad of advantages for any gardener, moving beyond the reliance on pre-grown seedlings. This fundamental skill empowers you with greater autonomy and flexibility in your gardening endeavors. Instead of being limited by what’s available at nurseries or through subscription services, you gain the freedom to cultivate a wider variety of plants from seed, often at a fraction of the cost. Pre-grown seedlings, while convenient, are prone to damage during transit, can arrive stunted, or may not even survive the journey, leading to wasted time and resources. Germinating your own seeds can be just as quick, if not quicker, than waiting for a shipment, and the satisfaction of nurturing a plant from its very beginning is an incredibly rewarding experience.
- You gain autonomy over plant selection, growing exactly what you desire.
- Significant cost savings can be achieved by germinating seeds instead of buying seedlings.
- Avoid the risk of damaged or unhealthy seedlings often encountered with shipped plants.
- Experience the deep satisfaction of watching a plant grow from a tiny seed.
The Hydroponic Advantage: Rockwool and Vermiculite for Seed Starting
In hydroponic systems, where traditional soil is absent, specialized growing mediums play a vital role in supporting plant roots and facilitating germination. Among these, rockwool cubes are widely favored due to their unique properties. Manufactured from molten rock spun into fine, wool-like fibers, rockwool provides a sterile, pathogen-free environment, minimizing the risk of disease for delicate seedlings. Its exceptional water retention capabilities ensure consistent hydration for seeds, preventing them from drying out, while its porous nature simultaneously allows for excellent aeration, preventing waterlogging and promoting healthy root development.
Beyond rockwool, vermiculite also proves invaluable in the germination process. This hydrated laminar mineral possesses remarkable water retention properties. When sprinkled into planting holes and on top of rockwool cubes, it acts as a moisture-retaining blanket, further preventing seeds from drying out. Its lightweight and loose structure ensure it doesn’t compact, allowing delicate sprouts to easily push through to the light.
- Rockwool offers a sterile, well-aerated, and moisture-retentive medium for seed germination.
- Vermiculite enhances moisture retention in the planting holes, protecting seeds from drying.
- The porous nature of rockwool prevents over-watering while providing root support.
- Both rockwool and vermiculite contribute to a stable and conducive environment for initial growth.
Step-by-Step Success: Your Germination Blueprint
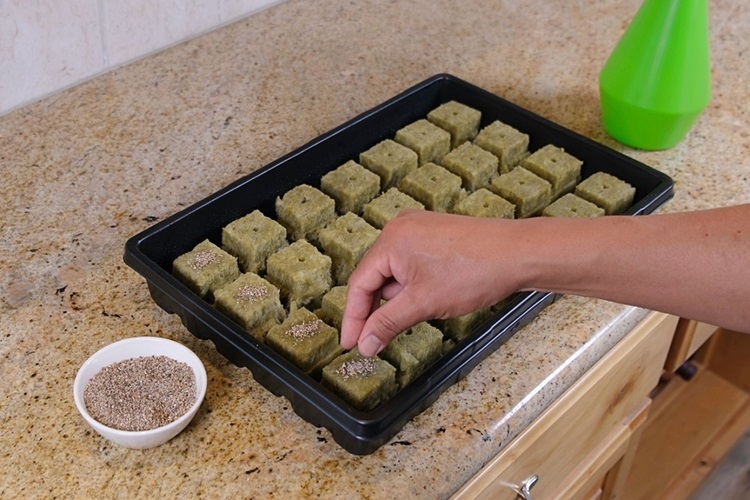
Achieving successful germination requires attention to detail and a systematic approach. Begin by preparing your rockwool: soak it in de-chlorinated water with a pH between 5.5 and 6.5 for about 10 minutes, then drain thoroughly. Next, plant your seeds, placing them about 1/4 inch deep in each rockwool cube’s planting hole. For smaller seeds, a moistened toothpick can be helpful. Once planted, a light misting with a spray bottle helps settle them.
The next crucial step involves applying vermiculite. Sprinkle a thin layer into the planting holes and over the cubes, then mist again to moisten. This helps retain moisture around the seeds. Throughout the germination period, consistent moisture and temperature are key. Maintain about 1/4 inch of pH-balanced water in the bottom of your tray, allowing the rockwool to wick moisture upwards. Daily misting is also beneficial. Aim for temperatures between 65 and 80 degrees Fahrenheit (18 and 27 degrees Celsius). A humidity dome can help maintain warmth and moisture, and a heating mat can be used in cooler environments.
Illuminating Growth: The Role of Garden Grow Lights
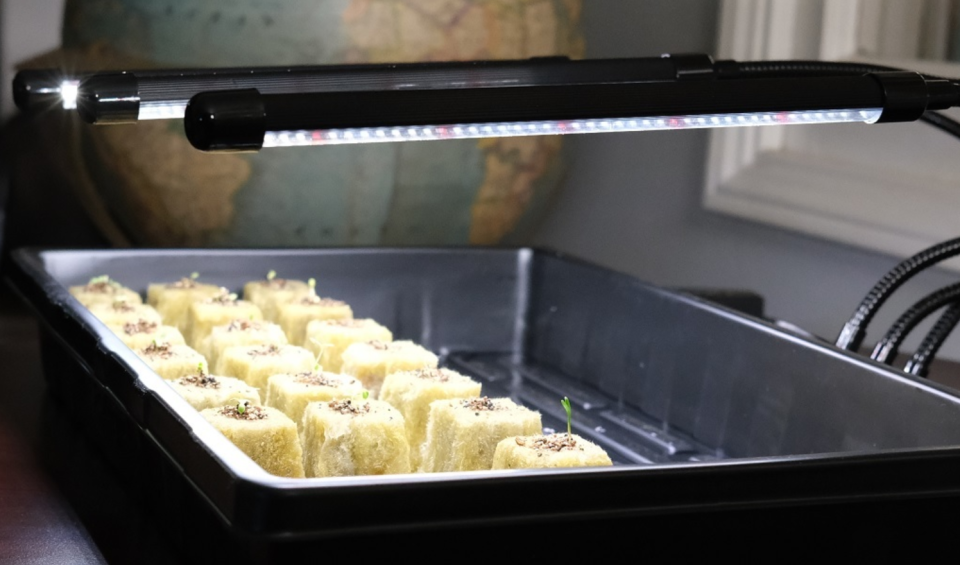
The moment you observe the first hint of green emerging from your rockwool cube, it’s time to introduce garden grow lights. This is a critical transition; newly sprouted seedlings are like hungry infants, desperately needing light for photosynthesis – the process by which they convert light energy into food. Position your grow light close to the seedlings, ideally 2 to 3 inches away from the top, without causing heat stress. Providing 14 to 16 hours of light per day is generally recommended for optimal growth. Remove humidity domes and heating mats once seedlings have emerged, as these are no longer necessary and can even contribute to legginess.
Delaying the introduction of light can lead to “leggy” seedlings, characterized by elongated, weak stems as the plant stretches excessively in search of light. Legginess can also be caused by insufficient light intensity or lights being too far away. While traditional gardening allows for “potting up” leggy plants by burying them deeper, this isn’t an option in hydroponics. Therefore, proactive lighting is paramount. Promptly moving sprouted seedlings under garden grow lights ensures they develop strong, healthy stems and robust growth, setting them up for successful transplantation into your hydroponic system.
- Introduce garden grow lights immediately upon seeing the first green sprouts to prevent legginess.
- Position lights 2-3 inches from the seedlings to provide adequate intensity.
- Provide 14-16 hours of light daily to support vigorous growth.
- Proper lighting prevents weak, elongated stems and promotes healthy plant development.
When to Make the Move: Transferring Your Seedlings
Once your seedlings have successfully germinated and grown under the care of your garden grow lights, it’s time for their next big step: transferring them into your main hydroponic system. This is an exciting milestone, signifying their readiness for independent growth. There are several key indicators that signal your seedlings are prepared for this transition. The most reliable sign is the formation of four true leaves. The first two leaves that appear are called cotyledons, and you should wait until two more distinct leaves develop underneath them. Another strong indicator is the emergence of roots from the bottom of the rockwool cubes, signifying a well-established root system ready to explore new territory. Finally, while not a definitive sign on its own, seedlings reaching a height of 1 to 2 inches often coincides with the other indicators of readiness. Observing these signs ensures your young plants are robust enough to withstand the transfer and thrive in their new environment.
Conclusion: Nurturing Growth from Seed to Success with ALTO Garden
Mastering the art of germination is a rewarding endeavor that empowers gardeners with greater control and satisfaction. From understanding the vital role of water and temperature to strategically employing garden grow lights for robust seedling development, each step contributes to a successful outcome. By carefully following these guidelines and paying close attention to your seedlings’ needs, you’re not just growing plants; you’re cultivating a deeper connection with nature and fostering a sustainable approach to gardening. ALTO Garden is dedicated to providing the knowledge and tools you need to achieve thriving growth from the very beginning.